Let’s Build A Digital Wallet From Scratch

Disclaimer: This is just a sample digital wallet I’m building that does not intend to become an actual wallet of use. For building an actual wallet you have to undergo a series of regulatory checks and verifications since this is money we are talking about.
So we have all used wallet apps at some time or another, with the advent of payment interfaces like UPI in India, wallets have become redundant, but there is an interesting case study to learn from their architectures, how they function and how they moved money around. In this post, that’s exactly what we’re going to cover.
Things we’ll cover:
- The tech stack we’ll use and the ledger architecture
- How to accept payments / Add money to the wallet
- How to store payment information
- How to transfer money between accounts.
We’re not going to cover a lot of code in this post, for the full code, check out the implementation of this post on GitHub in this repo: Smallet and a working version of this wallet here: Smallet Web App.
Tech Stack
I’m keeping the tech stack very simple for this, being a web developer, I decided to use the simplest approach to creating a cross-platform application (Using PWA Tech). I’m also going to take full advantage of serverless and JAM Stack to solve the problem of scale, and have to develop everything on the frontend.
So the tech stack becomes:
- Next.js for its powerful server-side rendering capabilities and serverless functions that take away the need for a custom backend server.
- React.js to be used with Next.js
- Chakra UI for UI Components (I’ve come to fall in love with it for its simplicity of use and flexibility)
- Firebase for user authentication, database and file storage (I love Firebase for it allows me to write the entire backend code all on the frontend)
- Razorpay for accepting payments to add money to the wallet (It’s got a nice test mode)
User Authentication and Initialization
The first part for any wallet system is authentication, I chose Firebase Authentication primarily because it allows me to add as many sign-in and sign-up options as there are imaginable. Phone Number authentication was the first choice since wallets have a lot of phone number interactions, but since I didn’t want people to feel left out, I added a Sign In With Google Button too.
User’s Document stored in the database is of the form:
// users/{User's Firebase Authentication UID}
{
    "createdAt": Timestamp,
    "updatedAt": Timestamp,
    "displayName": "John Doe",
    "email": "xyz@abc.com",
    "emailVerified": false,
    "id": "jZdH3Ot2FXVNl6MKi2z3cinSOTD2",
    "nTransactions": 0,
    "phoneNumber": "+911234556678",
    "photoURL": "URL",
    "providerData": { /* User's Authentication Provider Info */ }
}
While creating a user, we’ll also initialize the wallet document in Firestore for the user.
// wallets/{userId}
{
    "balance": 0,
    "id": "jZdH3Ot2FXVNl6MKi2z3cinSOTD2",
    "lastTransaction": null,
    "nSuccessfulTransactions": 0,
    "nFailedTransactions": 0,
    "nTransactions": 0,
    "user": "jZdH3Ot2FXVNl6MKi2z3cinSOTD2",
    "updatedAt": Timestamp,
    "createdAt": Timestamp
}
Adding Money To Wallet
The next natural step to using a wallet is to add money to it. After all, what are you going to transact against if there’s no money in your wallet?
For loading money, we follow a simple process shown in the flowchart below:

By Credit, I mean just add the payment amount to the existing balance in the wallet and connect it to a transaction.
For the above process, we need to have Razorpay initialized and the SDK loaded on our front end. Razorpay’s SDK handles the success and failure events all on the frontend using a Socket, provides multiple payment methods to make a payment, all in a standard checkout flow shown here.
The transaction entity is shown in the repository and can handle multiple types of transactions, like wallet Topups, money transfers between users and merchant purchase transactions.
How Users can transfer money among themselves
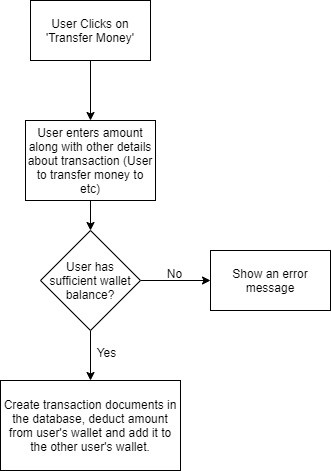
The primary use of wallets is transferring funds between users, it’s pretty simple to implement. Since there is no actual money involved in the process, this is a purely database-related operation with a few checks. Take a look at the flowchart below for implementation:

How Users can request money from each other
Another utility the wallet can provide is requesting money from another account, and on approval, deduct the balance from the user’s wallet and transfer it to the requesting user’s wallet.
As you might have noticed, we just need to make very slight tweaks in the above money transfer flow for the process to work.
Basically, for payment requests, create a paymentrequest entity in the database with details like fromUser and toUser with the amount and progress, notify the user being requested for the payment of a request, and provide them with a page to see the details of the request and an option to decline or complete the request.
If the user chooses to decline the request simply update the status of the payment request and don’t show it to the user again.
If the user chooses to pay, simply send the details of the payment request to the function responsible for handling money transfers and simply ask it to transfer the payment request amount. That should do the trick.
How Merchants can use the Wallet to sell items
Loading money to the wallet is only useful if the wallet can be used for purchasing something, after all, what good is money that you can’t spend? So it’s integral to offer the wallet as a payment method on platforms otherwise the users won’t have an incentive to use the wallets.
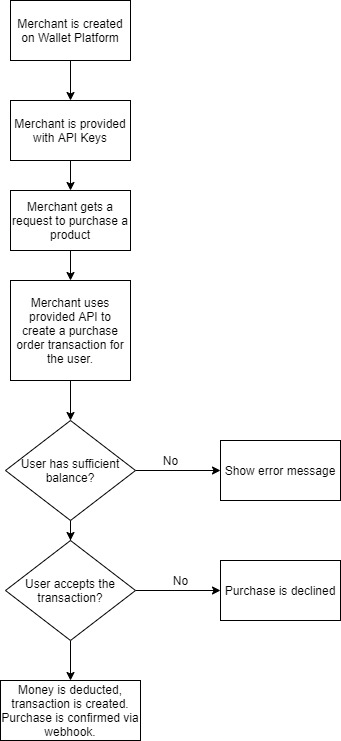
For that, there is a very simple method one can use that’s stated below:

- Create a merchant using the Admin SDK from the backend. Assign an API Key and API Secret for them:
// merchants/{merchantId}
{
    "merchant_name": "Merchant XYZ",
    "createdAt": Timestamp,
    "updatedAt": Timestamp,
    "apiKey": "hash of api key",
    "apiSecret": "hash of api key secret",
    "nTransactions": Number,
    "webhook": "URL of webhook to hit on success and failure of payment"
    // ...more fields
}
- Provide the merchant with an API Route to create a purchase order:
curl -XPOST -H
'Authorization: <apiKey>-<apiKeySecret>' -H "Content-type: application/json" -d '
    {
        "itemDetails": {
            "name": "Shoes",
            "price": 1556,
            "id": "184e3618-3ae1-11ec-8d3d-0242ac130003"
        },
        "amount": 1556,
        "quantity": 1
    }
}' '/api/merchants/createPurchaseOrder'
-
The merchant integrates the wallet as a payment method on their site, the user clicks on the payment method and the following process happens.
-
Create a purchase order in the backend, show the user the screen to approve the purchase. Once the user approves the purchase, create a deduction transaction and hit the webhook with
payment.successfulresponse, transfer the amount to the merchant’s bank account in the settlement period. This transaction id can be sent to the merchant for refunds and returns later on. -
If the user declines, create a failed transaction in the database and hit the associated webhook with a
payment.failedresponse.
One could even offer this as an SDK to the merchant in a form similar to the Razorpay Standard Checkout used by the wallet.
Note: This article contains concepts that are very simplified from their actual implementation, there’s a reason why there’s a team of hundreds working behind wallet and payment companies, it’s because things seem very simple on the surface but the actual complexities are visible only when you start building the product and getting feedback from customers. The point of this article was to explain how an MVP works for the wallet.
How the wallet can make money
There are many ways to monetize payment processors and wallets. Two of the common ones are:
- Charge a transaction fee from the seller for use of your wallet as a payment method on their store.
- Keep the money you receive from the users in an escrow or interest-earning account where the settlement period is more than one day, so you earn interest on the money before it’s used for payment to a merchant.
- Extend wallet services with other services that the company can offer, for example, Paytm and Freecharge both offer wallets as their core offering with a plethora of other services where their wallets integrate seamlessly.
Most wallets use all of the above ways to make money and the second point is pretty smart in my opinion.
Conclusion
So we have understood how a basic wallet works here, and an implementation of it is available in the form of Smallet on my GitHub page, don’t worry, everything’s in test mode so no actual money moves around so you can go crazy and try to break the wallet if you want to. 😉
I’ll love to see the many ways this could break and the challenges that actual wallet and payment companies have to go through to make their wallets work.