How Next.js renders your React App

Server-rendered React apps are amazing, they open up many possibilities that are not available to us with purely Client-Side Rendered applications, most importantly, SEO. But even more important, they make your site more accessible and discoverable, given whether the user’s browser supports JavaScript or not, they will still be able to see the site since a core part of the site will still be rendered as pure HTML and CSS for the end user’s browser to download, parse and paint.
With Next.js leading the server-side rendering front for React apps and other frameworks like Remix and Gatsby following, it will be interesting to learn how Next.js, other frameworks and React, in general, perform server-side rendering.
I was surprised to learn that React already has pretty good server-side support to build on top of. So the title is merely an eye-catcher, the post will be looking at a broad overview of how not just Next.js, but all server-side rendering frameworks available for React do it.
To keep the context clear, server-side rendering a React app is NOT making the app server-reliant, no app in the modern world is supposed to run completely on the server, your React app should always work on the client-side with user interactions. The server-side rendering part merely should be a bridge to enable discoverability of your React app (I.E: With SEO and crawlers being able to access it) and to make your React app more accessible, both of which are points I have mentioned above.
What the framework sends back from the server should be the initial state of your app where the user hasn’t had any interaction with your app yet.
Complications That Come With Server-Side Rendering of React apps
- React is meant for user interactions, which are not present on the server.
- In most server-side setups, you’ll usually be making calls to a database or an API and rendering data based on their response, with React apps, you can make API calls to get the data, but they run after your component mounts, which, if you remember, only happens on the client-side. So we need a way to fetch data before our component mounts and pass data to it as props.
-
Event handlers (Like
onClick,onError) won’t work on the server because:- Event handlers are functions and hence,
-
There isn’t a way to send functions from the server to the client
So basically, if your react component is supposed to render:
return <div onClick={() => console.log("clicked")>Click Me</div>What would come out after the initial render is simply HTML that has no idea any event listener was ever mounted on any element.
<div>Click Me</div>
- Many UI Libraries you’ll use are still meant for mounting when the
useEffectblock runs, anduseEffectblocks will only be executed when your components have been rendered to the client, hence, there is no way for those parts of the component to be accessible and reflect their content on the server-side.
Rendering Client-Side vs Server-Side, What’s the difference underneath?
There’s a very nice explanation on StackOverflow about the basics of what is supposed to happen on the server and what is supposed to happen on the client by Jeff P Chacko at this answer.
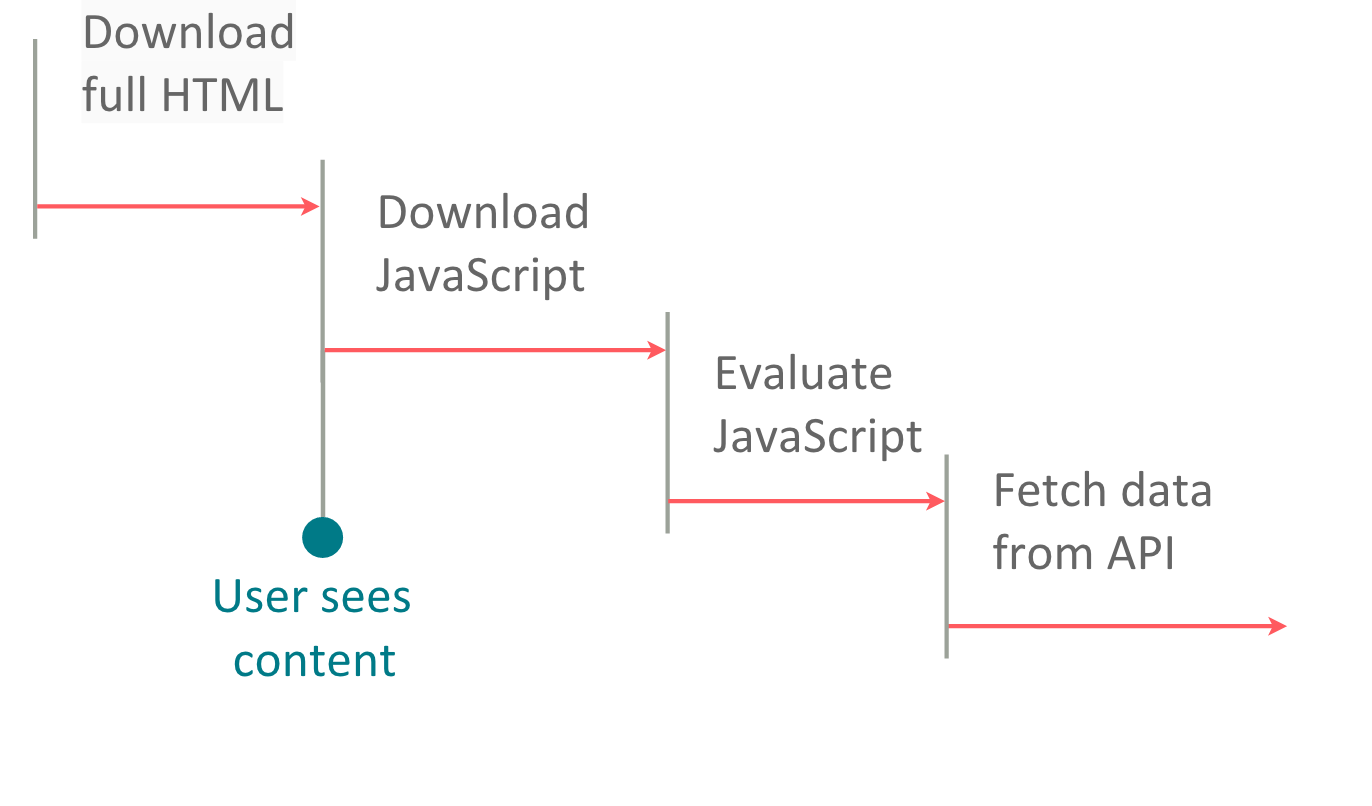
On Client-Side Rendered React Apps:
- There’s usually an
index.htmlfile that is loaded first - The React bundle is downloaded next
- Which in turn downloads the bundles for the components that have to be rendered.
- All the JavaScript is evaluated and the component is painted on the screen.
- At this point, the user can see the component.
- Data fetchers and side-effect blocks like
useEffectrun in the background and repaint the component after the side-effects with fully populated data.

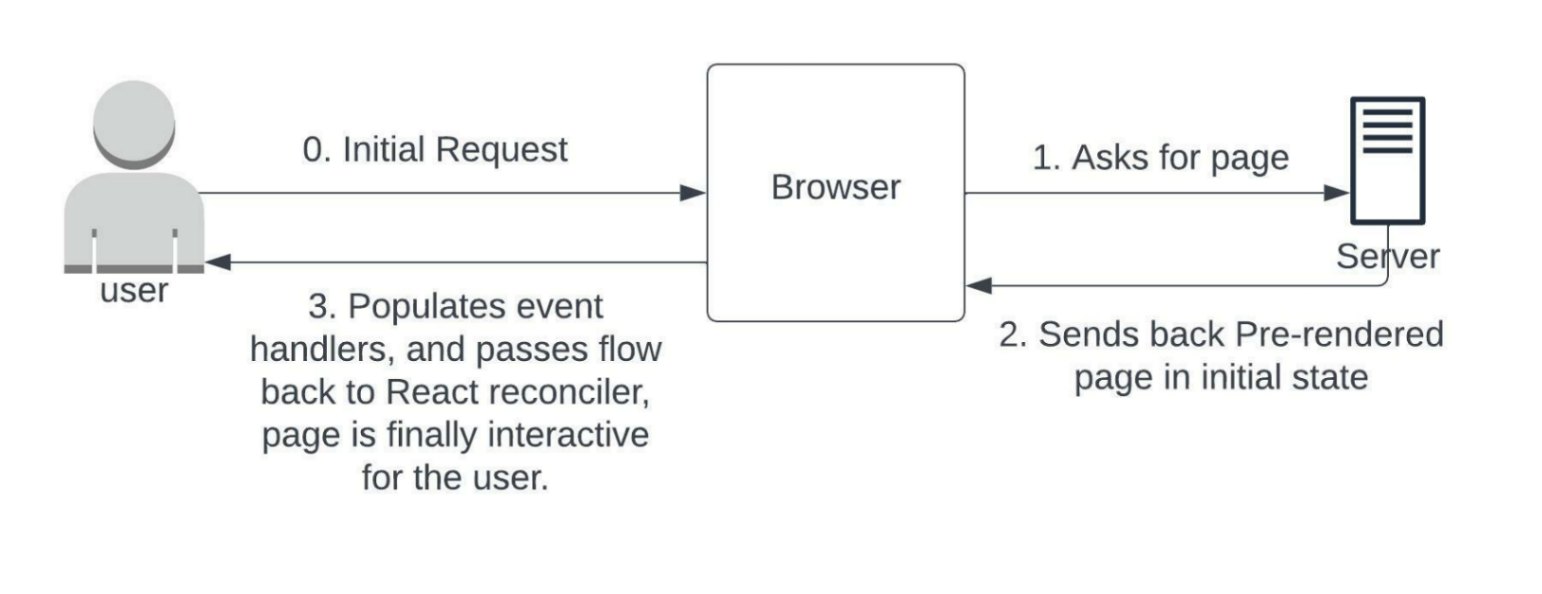
On Server-Side Rendered React Apps:
- The Server creates an HTML File with styles and the initial paint of the component.
- This HTML File is usually populated with the JavaScript code to be executed on the client-side as well.
- The server sends this file over to the client where the user can see the initial paint of the component.
- React tries to
hydratethe component at this stage, i.e: mount event listeners to the DOM Nodes and perform diffs to check if there are no discrepancies that arose between the output that the server sent and what the client ultimately rendered. - Any data fetching needed purely on the client-side is done at this point and the component is repainted.
- The job of updates and state management is handed over to React’s Reconiler.

React’s inbuilt functions that help us with Server-Side Rendering
React has a few inbuilt functions that we can use to render our components on the server-side, they are used by all server-side frameworks along with testing libraries that need to render content out from a component to run tests on them.
The functions can be in the react-dom/server package. The one we need is renderToString which renders the initial output of a component to HTML.
With a server like express, you can receive a request at an endpoint like /dashboard and render the Dashboard component out to a string and send it back as HTML.
app.get("/dashboard", async (req, res) => {
	const componentHTMLOutput = ReactDOMServer.renderToStream(
		<Dashboard {...props} />
	);

	return res.send(`<!DOCTYPE html>
    <html>
    ...
    <body>
        <div id="root">
            ${componentHTMLOutput}
        </div>
        <script type="text/javascript" src="./your-react-app-bundle.js" />
    </html>`);
});
Now you might ask, why the script tag with the your-react-app-bundle.js path. Well, that’s the JavaScript file that will contain the code that will be responsible for rendering your dashboard component and making it interactive to the user on the client-side. I.E: We will overwrite the contents of the root element received from the server, and replace it with a fully functional hydrated version of our React app with event handlers that the user can interact with.
React has a neat way of doing it, your bundle should include the transpilation for the below:
import React from "react";
import ReactDOM from "react-dom";

ReactDOM.hydrate(<Dashboard />, document.getElementById("root"));
How to handle data required to render the component
Now that it’s clear how we can mount and render our components on the server-side, and hydrate them on the client side. A natural question that comes up is, of course, how do we ensure that the data we need to render our component is available before the rendering happens.
Next.js provides us with multiple ways to do this, the most useful one is getServerSideProps, it is a function you export from your page file, that makes all the API Calls or Database calls required and returns an object with the props key, which is data that is passed to the component as props, that is then used in the rendering process. More about getServerSideProps here.
// Next.js getServerSideProps example
export async function getServerSideProps() {
	return { props: { title: "Title from the server" } };
}

export default function PageComponent(props) {
	return <>{props.title}</>;
}
Remix offers a similar solution, instead of getServerSideProps, it requires page files to export a loader function, which makes all the API calls required and return an object. Which can then be picked up during the render cycle using the useLoaderData hook in the component. More about Remix Data Loading Here.
// Remix example
export async function loader() {
	// Make your API calls here, remix will pass the returned value to the page component during render.
	return json({ title: "Title from the server" });
}

export default function PageComponent() {
	const serverSideDataFetched = useLoaderData(); // Will contain data fetched from the server-side, populated by Remix
	return <>{serverSideDataFetched.title}</>;
}
A Brief Overview of Next.js Rendering and Hydration
This is obviously by no way a fully accurate representation of how Next.js works (Next.js does a lot of work underneath to account for all sorts of things like static pages, custom error components, error boundaries, custom _document files and not to mention the other server-side data fetching method: getInitialProps), the source code is open source so anyone can read the code.
But this is pretty much what Next.js and other server-side frameworks like Remix work:
On the server:
app.use("*", async (req, res) => {
	const url = req.url;

	// Find the component matching closest based on the URL.
	// Next.js also accounts for dynamic params in the URL.

	const { default: Component, getServerSideProps } = await import(
		pageComponentPath
	);
	// Load data required for page to be rendered.
	const { props, redirect } = await getServerSideProps(
		contextCreatedFromRequest
	);
	if (redirect?.destination)
		return res.redirect(redirect?.permanent ? 308 : 307, redirect.destination);

	// Render the component otherwise
	const componentHTMLOutput = ReactDOMServer.renderToStream(
		<>
			{/* In case there is a root _app.jsx app wrapper */}
			<App {...props} Component={Component} />
			{/* or */}
			<Component {...props} /> {/* If there isn't a _app.jsx wrapper */}
		</>
	);

	return res.send(`<!DOCTYPE html>
    <html>
    ...
    <body>
        <div id="__next" data-reactroot>
            ${componentHTMLOutput}
        </div>
        <!-- Data for the client-side to pick up for rendering the component. -->
        <script type="application/json" id="__NEXT_DATA__">
            ${JSON.stringify({ props: { pageProps: props } })}
        </script>
        <!-- Other Scripts to rehydrate and take control on the client. -->
    </html>`);
});
On the client, for re-hydration of the server-rendered page with User Interactivity and event handlers, we can simply use the hydrate method available from ReactDOM to do the job for us. Normally you would send a transpiled version of the code below to the client and have it run the moment the first paint is triggered.
// Now on the client side.
const initialProps = JSON.parse(
	document.getElementById("__NEXT_DATA__")?.innerHTML || "{}"
);
ReactDOM.hydrate(
	<>
		{/* In case there is a root _app.jsx app wrapper */}
		<App {...initialProps} Component={Component} />
		{/* or */}
		<Component {...initialProps} /> {/* If there isn't a _app.jsx wrapper */}
	</>,
	document.getElementById("__next")
);
Bonus: Working Server-Side with React-Router
Now, a user app is incomplete without routing. On the client-side, React Router DOM is what we use commonly, it allows us to specify routes for our application component by component. With Next.js that functionality is abstracted to automatic-service-discovery from the pages directory in your project. But Remix depends on React Router DOM, and the router supports server-side rendering by default. The pattern becomes something like the following:
On the server:
import ReactDOMServer from "react-dom/server";
import { StaticRouter } from "react-router-dom/server";
import App from "./App";

app.get("*", (req, res) => {
	let html = ReactDOMServer.renderToString(
		<StaticRouter location={req.url}>
			<App />
		</StaticRouter>
	);
	res.send("<!DOCTYPE html>" + html);
});
And on the client you just hydrate the route for any event listeners or client-side JavaScript or side-effects:
import ReactDOM from "react-dom";
import { BrowserRouter } from "react-router-dom";
import App from "./App";

ReactDOM.hydrate(
	<BrowserRouter>
		<App />
	</BrowserRouter>,
	document.documentElement
);
This is picked from the official documentation of React Router DOM - Server Side Rendering
If you’re adventurous, a great article describing how to turn your already existing Create-React-App scaffolded React app into a server-rendered app can be found here.
The entire process of rendering React apps server-side and getting them ready for the end-user can be simplified to the following:
