Building our own Automated Testing Stack On The Cloud

As your application grows in size, everything can’t be manually verified. Any change you make could end up unexpectedly affecting, altering or breaking a number of other things. In such a case, having tests for your codebase is extremely important.
Even for someone just starting out with a project, constant test-driven development ensures the quality of code is production-ready and its nature predictable. Contrary to the belief: “Writing tests will slow me down.” Testing from an early stage prevents bugs later on which leads to less time being spent in the future fixing bugs.
Even if you don’t have tests in your app’s source code right now, it’s never a bad idea to start adding them. One good way to get started with functionality testing for your app is via End to End tests or E2E tests, they focus on testing the app’s functionality from the end user’s perspective and are prevalent in companies that are product-focused, like to rapidly release features and make changes.
One challenge with End To End tests is that they are heavy to run given they usually run entire browsers to spin up in order to test and very difficult to run cross-company or setup on the cloud (Most E2E testing software providers do provide a hosted way to run tests on the cloud but they often require licenses per user and are extremely expensive, much more expensive than the cost you would incur running them on your own servers). These are the exact problems we’ll be tackling in this post.
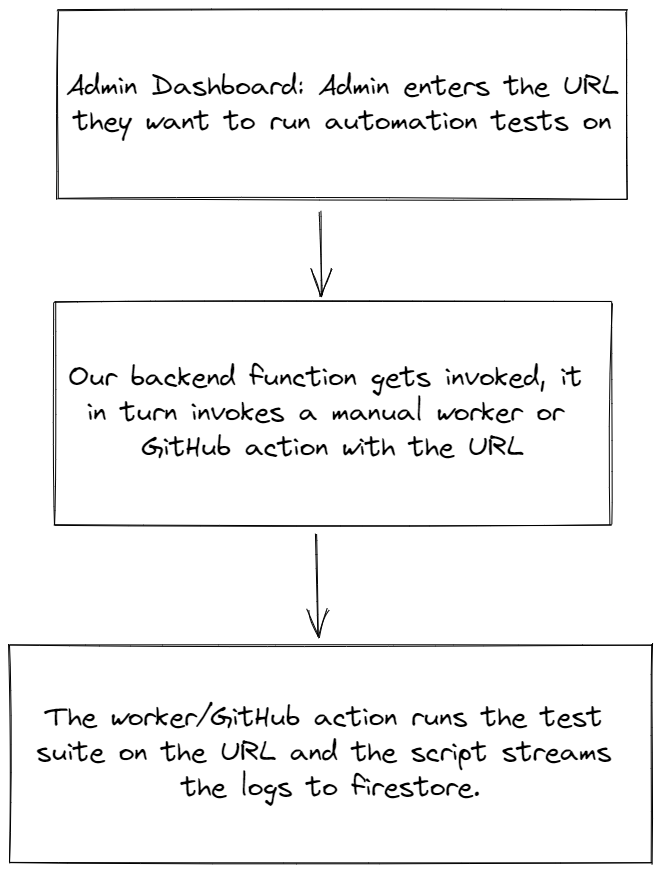
We’ll create a framework to trigger an E2E tests suite from an admin dashboard, run them on the cloud on demand using GitHub Actions and stream their logs in real-time to the dashboard using Firestore (bonus).
Sections
- The Stack
- Our Directory Structure
- Let’s set up Cypress and write some tests
- Storing and transporting logs
- Let’s set up our test runner script
- Let’s set up the GitHub Action
- Getting Your GitHub Token
- Let’s integrate the setup with our dashboard and stream logs via Firestore
- Conclusion
The Stack
- We’ll assume that we already have an application running with any JavaScript framework.
- We’ll write some basic end-to-end application tests with Cypress.
- We’ll be using GitHub Actions to create a manual-trigger workflow which we’ll invoke using GitHub’s REST API.
- We’ll be using Firestore to stream logs from our tests in real-time to our dashboard.
An overview of what the flow will look like:

This is different from the usual flow that most companies use where tests are run after each deployment. We won’t be implementing that flow as there might be deployments where automated tests (which can get very heavy;, consume a lot of resources and take a lot of time) might not need to run (For example, minor copy/colour changes). Plus that’s much easier to implement 😛.
Our Directory Structure
The directory we would be using to run the tests would look something like this:
.
└── our-app/
    ├── src/
    │   └── ...our app's code
    ├── e2eTests/
    │   ├── visit-website.js
    │   ├── login-to-website.js
    │   ├── create-entity.js
    │   ├── logout-of-website.js
    │   ├── ...
    │   └── ...
    ├── outputs/
    │   └── ...temporary test output files to be stored here
    ├── scripts/
    │   ├── index.js
    │   └── run-tests-in-pipeline.js
    ├── cypress.json
    └── package.json
The src folder would house the source code for the web app.
We would have our Cypress tests in our e2eTests folder. (To be set up in the next section).
Let’s set up Cypress and write some tests
// cypress.json

{
	"record": false,
	"screenshotOnRunFailure": false,
	"video": false,
	"screenshot": false,
	"integrationFolder": "e2eTests/integration",
	"testFiles": [
		// Use this array to specify the order of execution for your test files. For example:
		// "visit-website.js", "login-to-website.js", "logout-of-website.js"
	]
}
Storing and transporting logs
Test failures are not useful if we can’t access the logs containing detailed information about WHY a test failed. Thankfully, Cypress and all other testing tools have great logging for both test failures and successes, the challenge is to store and transport those logs.
Traditionally there are two ways to store logs for tests or pipelines in general:
- Store the logs in a file that can be accessed via an endpoint later on.
- Store the logs in a database
The file approach is the most common as logs are not frequently accessed and extremely fast reads for logs are not expected, plus file storage is cheaper than database storage.
There are hybrid approaches where logs for streaming in real-time to a dashboard are stored in a database and then asynchronously transported to a file.
Later on, files can be moved from one storage class to another to reduce costs and even deleted depending on the retention period or the requirement of test logs.
GitHub Actions gives us API endpoints to retrieve logs for a run but it’s not real-time, something we would ideally want in the dashboard of our test.
We could set up polling to GitHub endpoints for logs while the test is active or we could set up a wrapper script around our tests command, listen to stdout and stderr ourselves and send those logs to a real-time enabled database, in our case: Firestore.
Let’s see this approach in action in the coming section.
Let’s set up our test runner script
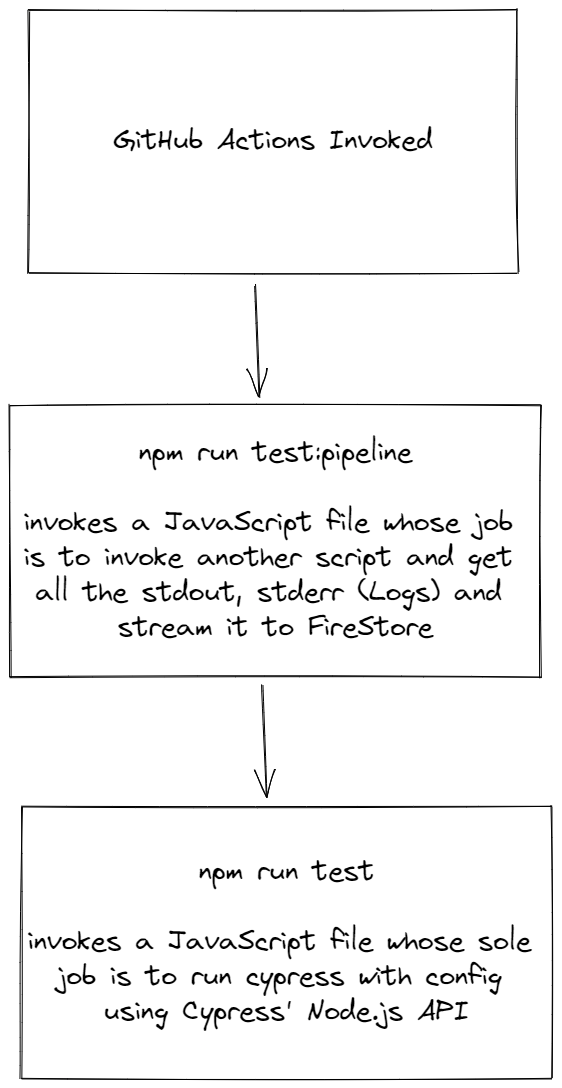
We’ll follow this simple flow to run our tests inside the worker/GitHub Actions:

In essence, we’ll be using Node.js’s spawn child_process function to trigger a node.js file which in turn runs Cypress using its module API. The parent script is responsible for getting the logs for the run and streaming it to Firestore for us to view in real time.
A benefit of this model is that the main tests file can be invoked even outside of GitHub Actions without a problem or a change.
// Our package.json scripts
"scripts": {
    "test": "node ./scripts/tests/index.js",
    "test:pipeline": "node ./scripts/tests/run-tests-in-pipeline.js"
},
Our scripts/tests/index.js file that runs Cypress would look like this:
const cypress = require("cypress");
const fs = require("fs");
const cypressConfig = require("./cypress.json");

cypress
	.run(cypressConfig)
	.then((results) => {
		// Save test results to a file
		fs.writeFileSync(
			`outputs/test-results.json`,
			JSON.stringify(results, null, 4)
		);
	})
	.catch((err) => {
		console.error(err);
	});
And our invoker file:
// scripts/tests/run-tests-in-pipeline.js
const { spawn } = require("child_process");
const { readFileSync, unlinkSync } = require("fs");

async function runTests() {
	// Don't run if it's not GitHub actions
	if (!process.env.CI && !process.env.GITHUB_ACTIONS) return;

	// Spawn the process for tests.
	const testingProcess = spawn(`npm run test`, { shell: true });

	testingProcess.stdout.on("data", (data) => {
		const logString = data.toString();
		console.log(logString);
		if (logString.trim().length)
			// Do something with this log
	});

	testingProcess.stderr.on("data", (errorLog) => {
		const errorLogString = errorLog.toString();
		console.error(errorLogString);
		if (errorLogString.trim().length)
			// Do something with this log
	});

	testingProcess.on("close", (code, signal) => {
		console.log(`Test Suite done with exit code: ${code}`);
		if (code || signal) {
			// Errored Test Results or interrupted by an external process in the middle.
			// Handle this error
		} else {
			// Exited without any error
			// Read the results and store them in Firestore.
			try {
				const resultFilePath = `./outputs/test-results.json`;
				const results = readFileSync(resultFilePath, "utf-8");
				// Do something with the results of the run.

				// Delete this file now that it's not required anymore
				unlinkSync(resultFilePath);
			} catch {}
		}
	});
}

runTests();
These scripts can now be invoked inside an automated environment like GitHub actions.
Let’s set up the GitHub Action
We will run our tests via GitHub Actions as mentioned earlier.
GitHub Actions has an amazing feature where we can trigger a workflow on demand: GitHub Actions: Manual triggers with workflow_dispatch via the dashboard or via its API.
It runs on the workflow_dispatch event. Our file for the workflow will look like the following:
# .github/workflows/run-tests.yaml
name: Run Tests

on: workflow_dispatch

jobs:
  deploy:
    name: Run Tests
    runs-on: ubuntu-latest
    env:
      NO_COLOR: 1 # This simply prevents special/unrecognisable characters from popping up on the logs due to colour codes being logged

    steps:
      - name: Checkout Files
        uses: actions/checkout@v2

      - name: Setup Node.js
        uses: actions/setup-node@v3
        with:
          node-version: 14

      - name: Install dependencies
        run: npm i --only=prod

      - name: Setup Cypress and Run Tests
        uses: cypress-io/github-action@v4
        with:
          command: npm run test:pipeline
Allowing different URLs to be tested via GitHub Action inputs
In a real-life system, you would want the tests to be capable of running on different URLs and not just a fixed one. In such a case, we can update our GitHub Action’s inputs for the workflow_dispatch event:
on:
  workflow_dispatch:
    inputs:
      url:
        description: "URL to run the tests on"
        default: "<Default URL of your website to run tests on>"
These inputs would be available to us via the github.event.inputs.url context. We can extend our tests environment variables:
env:
      NO_COLOR: 1
      TEST_RUN_URL: $
And then pick up the variable in our cypress script:
cypress
	.run({
		...cypressConfig,
+ 		env: { URL: process.env.TEST_RUN_URL },  // Our cypress tests will pick up the URL environment variable
	})
Getting Your GitHub Token
In order to run the above GitHub action via GitHub’s REST API, we need an API Key. We can create one from our GitHub dashboard here.
Follow the steps in this guide to create a personal access token which we’ll use in the future: Creating a personal access token - GitHub docs.
Make sure to add the workflow scope to your token in order to make it work for GitHub Actions via GitHub’s REST API.

Let’s integrate the setup with our dashboard
Now that we have created scripts and a manual action to run them, along with our GitHub API Token. Let’s integrate them into our dashboard.
To understand this section, I’m assuming that for your web apps you must have a dashboard or a manager express/Node.js server with which you run scripts or perform maintenance or view stats. Most web apps do.
First, we’ll create a backend controller with Node.js and express to trigger the GitHub Action using the token we just created. This is the API endpoint we will be using.
module.exports = async (req, res) => {
	try {
		const { url } = req.body;

		// Add your logic to check if the admin is the one invoking this route.
		// Reject the request if it isn't.

		// Invoke GitHub Actions workflow.
		await fetch(
			`https://api.github.com/repos/.../actions/workflows/run-tests.yaml/dispatches`,
			{ inputs: { url } },
			{
				headers: {
					authorization: `Bearer ${process.env.GITHUB_ACCESS_TOKEN}`,
				},
			}
		);

		return res.send({ success: true });
	} catch (err) {
		console.error(err);
		return res.send({ success: false });
	}
};
Once we add the above controller to our backend or via a Cloud/Edge Function if you’re using a service like Firebase, Vercel or Supabase, we can simply create a dashboard on the front end to hit the endpoint corresponding to the controller and have it trigger the tests.
Bonus: You could create a full-fledged dashboard that spans multiple test repositories for everything from your web apps to your backend servers using various tools like Selenium, Jest and whatnot! As long as it runs on GitHub Actions, it’s doable.
Bonus: Streaming Test Logs to our dashboard using Firestore
Note: This section requires some understanding of Firebase, its amazing Cloud Firestore database and the Firebase Admin SDK.
Now comes the interesting and exciting part. We had discussed ways of storing logs for our test runs, but since we want real-time streaming of our logs, the simplest and quickest way to do it would be using Cloud Firestore that has real-time streaming of data out of the box.
We have a wrapper script that receives data from stderr and stdout streams, we will simply send over those streams of data to a document in Firestore, and listen to changes in that document in real-time from our admin dashboard.
Let’s set up our Firebase project if not already done by following the steps here.
To communicate freely with our database from our script, we’ll use the Firebase Admin SDK with a service account (It’s a JSON file used to authenticate our Admin SDK), the contents of which we’ll add as a FIREBASE_SERVICE_ACCOUNT environment variable on GitHub Actions secrets.
Let’s add the FIREBASE_SERVICE_ACCOUNT environment variable to the Action’s environment list and then initialize Firebase Admin SDK in our app.
env:
    FIREBASE_SERVICE_ACCOUNT: $
    NO_COLOR: 1
// firebase/admin.js
const admin = require("firebase-admin");

const serviceAccount = JSON.parse(process.env.FIREBASE_SERVICE_ACCOUNT);

admin.initializeApp({ credential: admin.credential.cert(serviceAccount) });

module.exports = admin;
Now that we have our Admin SDK set up. In our runner script, we’ll initialize 3 docs. One for the main metadata and the other two will be to store the logs and end results object that Cypress produces for the test run. They could be subcollection documents or documents in separate collections. I personally prefer the separate collections approach as it’s just easier to see all collections and tables from the top and better to search for data.
/automated-tests/{testId}
   /logs/{testId}
   /results/{testId}

(or)

/automated-tests/{testId}
/automated-tests-logs/{testId}
/automated-tests-results/{testId}
Let’s set up the refs for these documents and initialize them at the beginning of the test run using a batched write.
const admin = require("./firebase/admin");

const { firestore } = admin;
const db = firestore();

const newTestRef = db.collection("automated-tests").doc();
const testRunId = newTest.id; // Guaranteed to be unique and random for this collection.
const newTestLogsRef = db.collection("automated-tests-logs").doc(testRunId);
const newTestResultsRef = db.collection("automated-tests-results").doc(testRunId);
Now let’s set the contents of the documents before starting the run:
// Environment variables exposed by GitHub Actions
const workflowRunId = process.env.GITHUB_RUN_ID;
const workflowRepository = process.env.GITHUB_REPOSITORY;
const workflowRunURL = `https://github.com/${workflowRepository}/actions/runs/${workflowRunId}`;

console.log("Current Workflow Run URL: ", workflowRunURL);

const now = firestore.FieldValue.serverTimestamp();
const sixDaysFromNow = new Date(new Date().getTime() + 6 * 86400 * 1000);

batch.set(newTestRef, {
	startedAt: now,
	status: "running",
	id: testRunId,
	createdAt: now,
	deleteAt: sixDaysFromNow,
	updatedAt: now,
	actualURL: workflowRunURL,
});
batch.set(newTestLogsRef, {
	testSuite: testRunId,
	outputLogs: [],
	errorLogs: [],
	createdAt: now,
	deleteAt: sixDaysFromNow,
	updatedAt: now,
});
batch.set(newTestResultsRef, {
	testSuite: testRunId,
	results: null,
	createdAt: now,
	deleteAt: sixDaysFromNow,
	updatedAt: now,
});

await batch.commit();
Now finally let’s update our stream listener functions:
testingProcess.stdout.on("data", (data) => {
    const logString = data.toString();
    if (logString.trim().length)
        newTestLogsRef.update({
            updatedAt: now,
            outputLogs: firestore.FieldValue.arrayUnion(logString),
        });
});

testingProcess.stderr.on("data", (errorLog) => {
    const errorLogString = errorLog.toString();
    if (errorLogString.trim().length)
        newTestLogsRef.update({
            updatedAt: now,
            errorLogs: firestore.FieldValue.arrayUnion(errorLogString),
        });
});

testingProcess.on("close", (code, signal) => {
    console.log(`Tests: ${testRunId} done with exit code: ${code}`);
    if (code || signal) {
        // Errored Test Results or interrputed by external process in the middle.
        newTestRef.update({
            status: 'errored',
            endedAt: now,
            updatedAt: now,
        });
    } else {
        newTestRef.update({
            status: 'completed',
            endedAt: now,
            updatedAt: now,
        });

        // Read the results and store them in Firestore.
        ...
        if (results) newTestResultsRef.update({ updatedAt: now, results });
    }
});
Note that in the above snippets:
- We’re using FireStore’s amazing
FieldValueproperty that allows us to set correct timestamps at the database level using theserverTimestampfunction and atomically add to an array using thearrayUnionfunction. You can read more about these here. - We’re also setting a
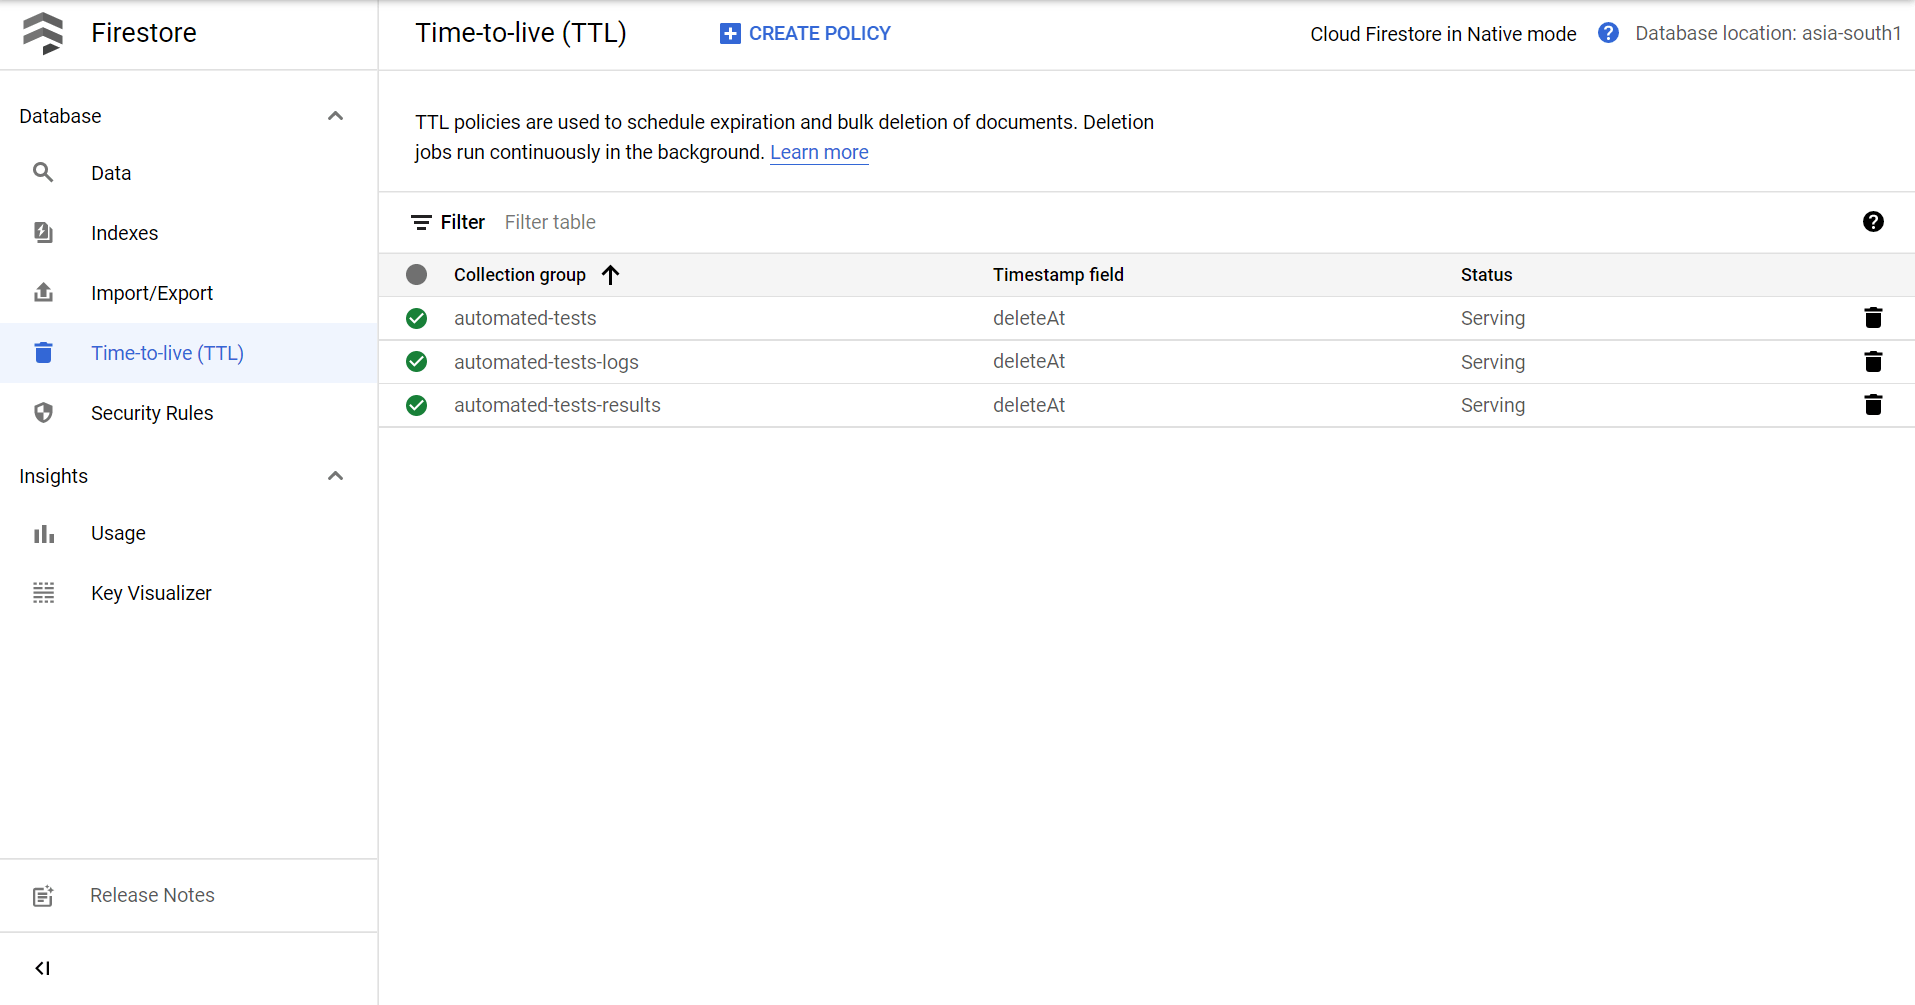
deleteAtfield to a timestamp six days from now, this helps us ensure that we can delete the document using a CRON job or now the new Google Cloud’s Firestore TTL feature which auto-deletes documents based on a timestamp in the document’s data. This ensures that for internal purposes we can store logs and test results for a set amount of time and then have them deleted automatically without adding to the Firestore storage and indexes bill.

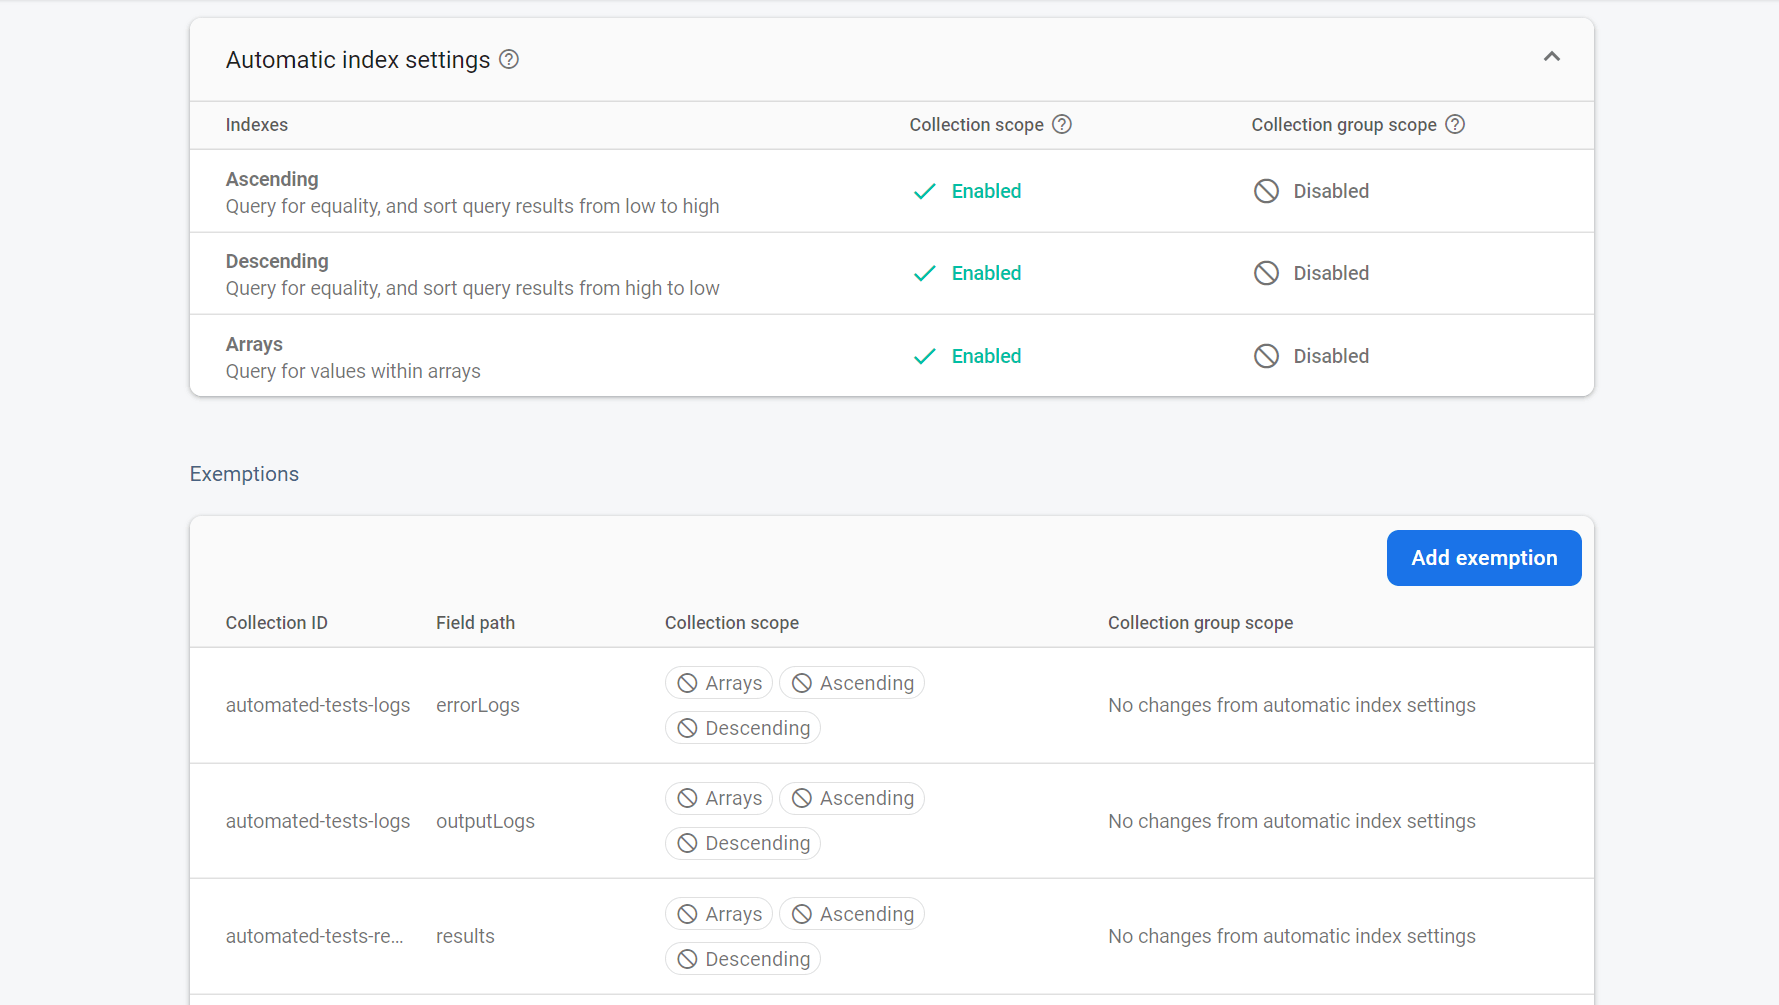
Another optimization we can make is that we can ask Firestore not to index any complex fields like Arrays in the document. Firestore indexes all fields automatically to search for documents quickly (Even arrays and nested objects), this is not efficient or cost-effective in the long run and it’s important we unindex fields we are sure we won’t be using to search in the future.
To do so, we can go to Firestore’s Indexes section and add exemptions to the indexing rule.

Now all that we have to do is set up Firebase’s Client SDK on our admin dashboard and set up a real-time listener to listen to changes in the logs and result documents for the test. Make sure to add security rules to prevent unauthorized access to the docs. You could set them up in any way you want to display the test information.
Conclusion
The approaches we went through to set the system up were definitely not the most optimized and someone with a ton of experience in this field might find out a lot of flaws in the approaches we’ve taken.
But for a simple system whose sole responsibility is to run tests and show the corresponding output, it’s a good start in my opinion.