Alt - Enabling UPI QRs with Payment Gateways
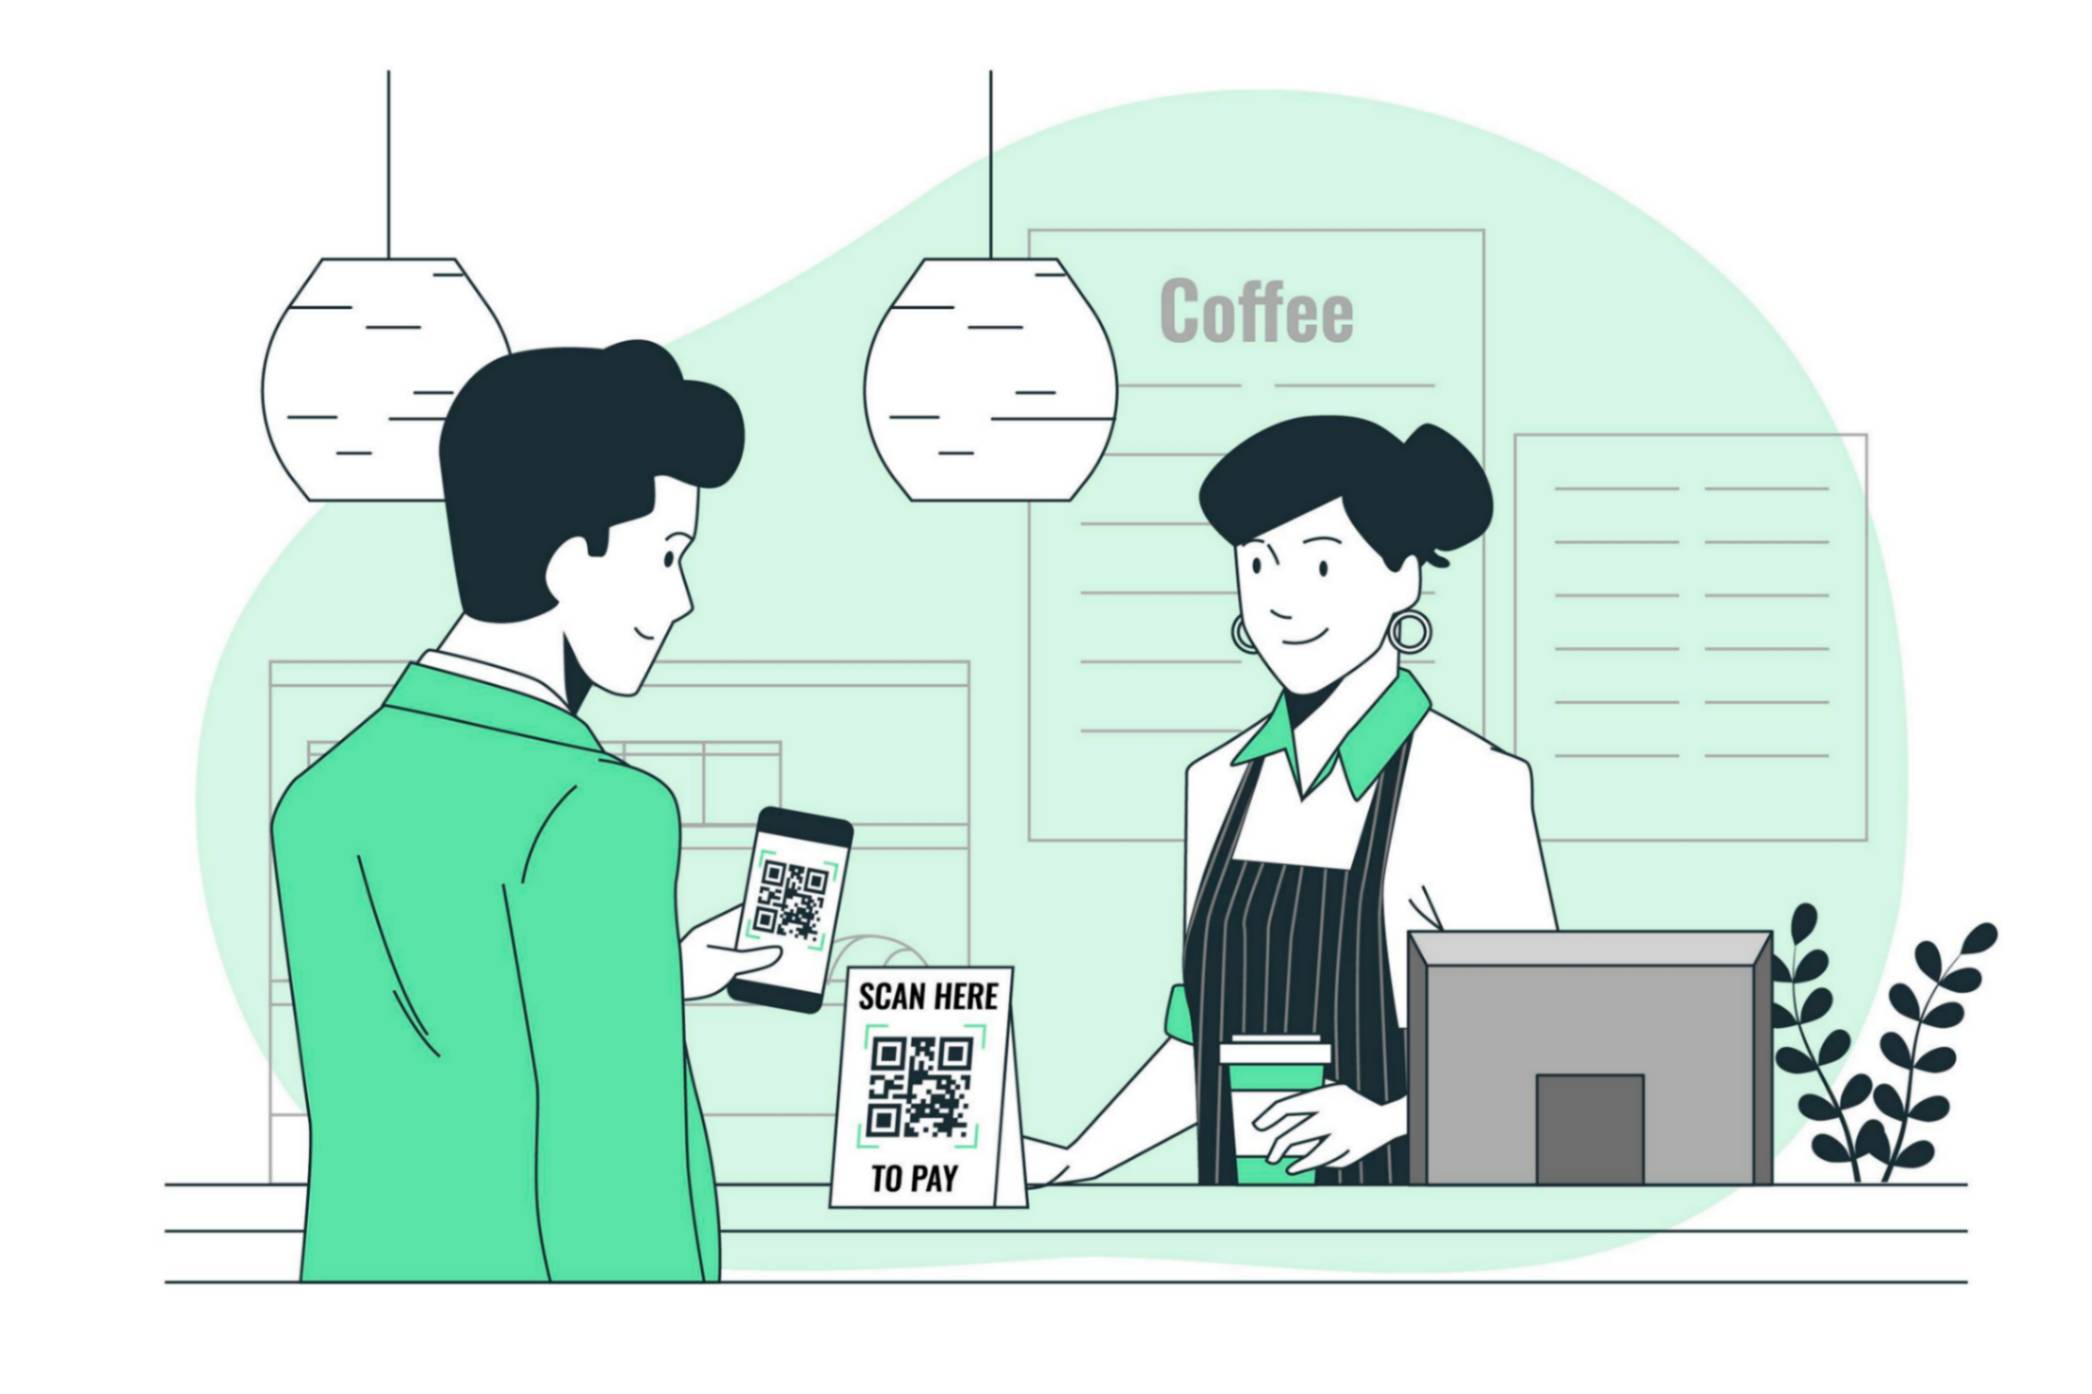
Note: All the information in this post and the final project is in an experimental sandbox as these matters require regulatory oversight from the concerned authorities.
UPI is amazing! The seamlessness and convenience it provides are great. However, there are a few problems I noticed with UPI that we’ll be looking into in this post.
A few of those issues include:
- UPI is in most cases, connected directly to your bank account, which introduces a little bit of risk when paying directly via your bank account.
- UPI being linked to your bank account, means that any payment, however small the amount, is directly debited from your bank account. I find my bank account statement littered with small transaction amounts like 15-50 rupees which I might not have track of and have a hard time recalling.
- There are no alternate modes of payments available with UPI, Credit Card Challengers like Slice offer you UPI via a prepaid card loaded through a credit line extended to you to make payments. But as of writing this post, that method of loading credit into a prepaid card connected to UPI is no longer available post RBI stepping in.
I wanted to tackle the third issue primarily, and that is when I realized that UPI QR Codes are nothing but simple upi:// protocol URLs with some basic information about the receiver’s UPI Address in the following format:
upi://pay?pa=<merchant_upi_id>&pn=<payee_name>&am=<amount>&tn=<transaction_notes>
This standard format enables different UPI Apps to read from a single UPI QR Code, and it’s one of the most brilliant innovations from NPCI in my opinion.
Now, there’s a simple customization hack that can be done to enable UPI QR Codes to be used with other payment methods, one that doesn’t involve making any changes to the existing UPI standard, but working around it to enable other payment methods.
How Would The Flow Work
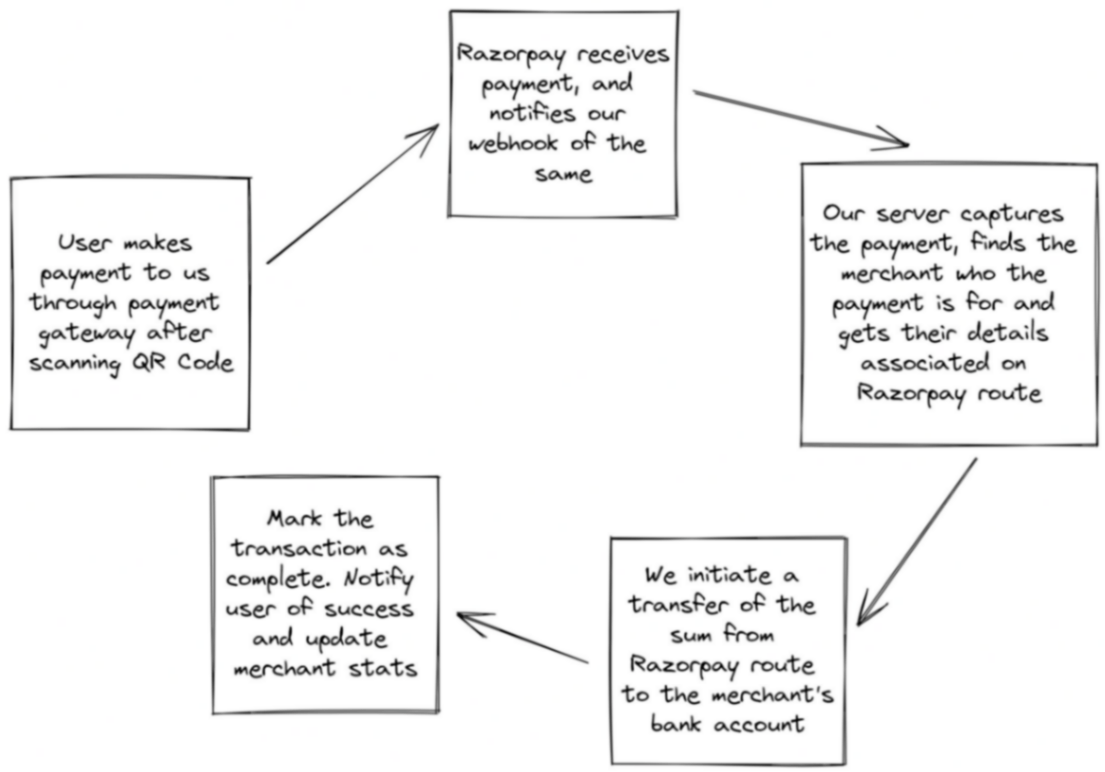
A brief overview of a possible solution and the one that I would be working on in this post is:
- A merchant signs up for our service via our merchant app, and gives us their bank account details to which we can credit money.
- The merchant scans his UPI QR Codes and adds them to our merchant app, the app determines the UPI ID from the QR and stores the QR Code URL if it already doesn’t exist in our database.
- Customers use our main app to scan that QR Code when they are about to make payments.
- Our App checks for the existence of a QR Code URL matching the one that the user just scanned, if it exists, our app asks the user for the amount to pay and then opens a checkout page using a service like Razorpay Standard Checkout, the user then pays the amount to us using the checkout page. If the QR Code doesn’t exist in our database, we simply forward the user to a UPI app on their phone using the
upi://protocol.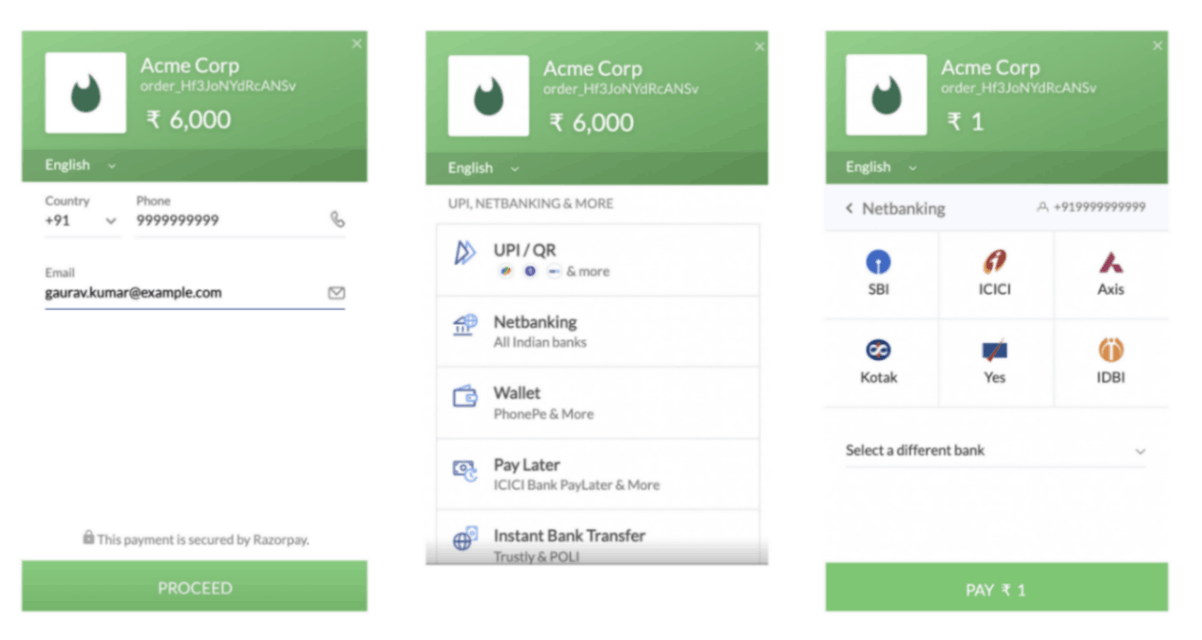
- Once we get confirmation from Razorpay or the concerned payment gateway that the payment is successful, we immediately transfer the money to the merchant’s bank account using the details that they gave us in step 1.
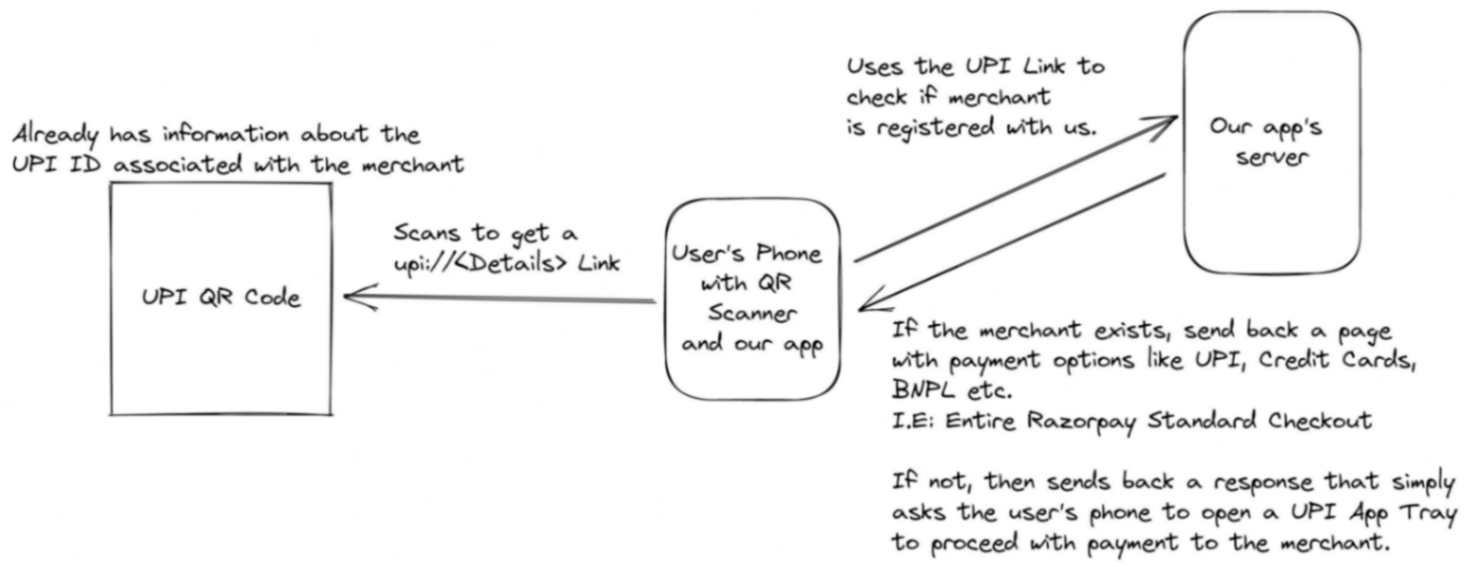
The Merchant Onboarding and Verification Flow will look something like the following:
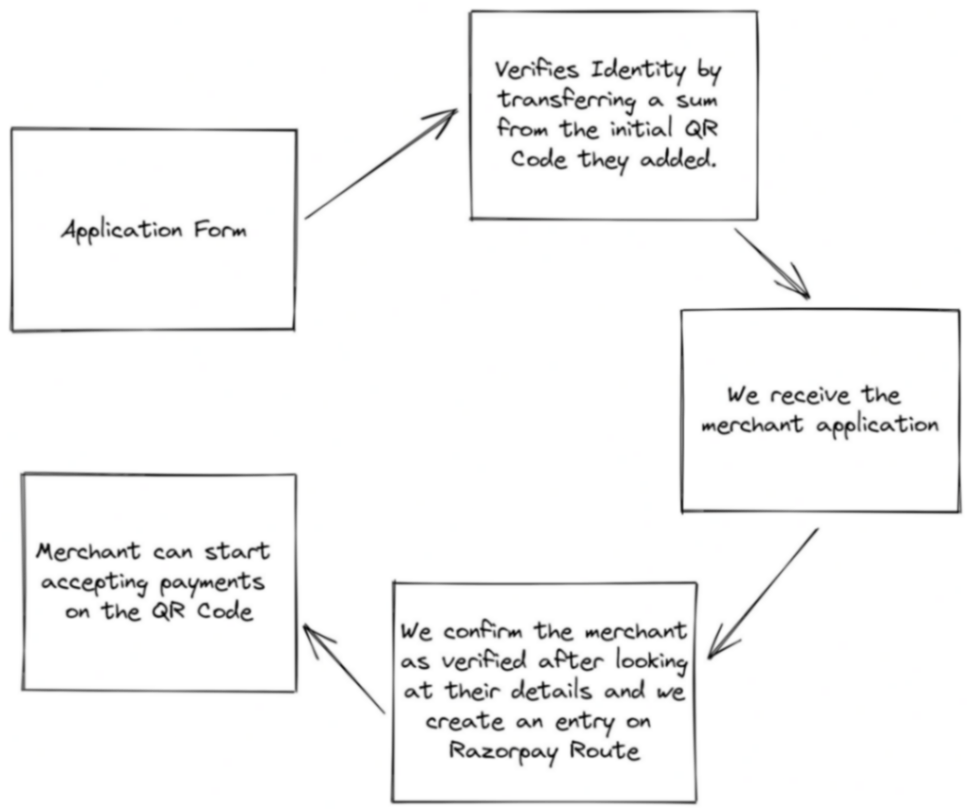
The Post Payment Flow would look something like the following:
What This Flow Isn’t.
Let me be honest, if you’re a Product Manager reading this post, I know you’re most likely going “What a terrible idea! This just slows down the user process.” and you would be correct.
When people use UPI, they do so for the convenience of simply scanning a QR code, entering an amount and a pin, and going on with their life. Users don’t like using Credit Cards or swiping Debit Cards at Small Grocery stores because of the following reasons:
- The ticket sizes for the purchases are usually very small, less than 100 rupees.
- The hassle of pulling out a Credit Card or Debit Card while other people might be waiting is a social issue.
- The shopkeepers might not even have a POS Machine to accept other forms of payments, they have relied historically on majorly cash, even the push to UPI was a breakthrough that for a majority of the population, would have been unexpected. The adoption of UPI by shopkeepers took even me by surprise.
The process we described in the above section does not simplify the experience for the end-user at all, it is merely a way/experiment to use UPI’s ubiquitous standard and reach to give a niche set of users who would use providers like BNPL Providers or Credit Cards or what not to make payments.
How Do We Prevent Identity Fraud?
One might be correct to identify that since a step of the merchant onboarding involves them scanning the QR Code connected to their UPI ID, what’s stopping someone else from registering the QR Code under their name and registering their bank account to trick other people into paying them instead of the shopkeeper/merchant.
There is a simple way to verify a UPI ID belongs to a specific person or a merchant, one of them is obviously to use the APIs available to check the phone numbers linked to a UPI ID that has been scanned.
Another, more robust version is to use the following flow:
- The merchant scans their UPI QR, and we get the UPI ID and URL out of the QR.
- We create a temporary bank account meant to receive a maximum of 1 rupee in it for a short span of say, 6 hours using a service like Razorpay Smart Collect.
- We ask the merchant to deposit 1 rupee from the UPI ID they just scanned.
- Once they do it, Razorpay Smart Collect will send us a webhook response to our server.
- Our server verifies if the payment came into the bank account from the concerned UPI ID, meaning the owner of that UPI ID was the one who scanned the QR Code. The server proceeds to close the bank account, refund the money to the merchant’s bank account and mark the QR as verified.
Only verified QR Codes can be used to make payments post this change integration. At a regulatory level, KYC can help alleviate a lot of the concerns related to identity fraud.
Overview Of the App
The following parts of the post are going to be a little technical, so please follow along if you’re curious about developing this as even I am not sure how this will work.
We’ll be using the following setup:
- Next.js for our frontend, it will also act as a hybrid to create a payment using its Server-side routes at
/api. - Supabase for our backend as a service as I’ve always wanted to try it out, this will handle User Authentication, Storage and Database for us.
- React Native to build our mobile app to scan a QR Code, and open a web view for completing a payment.
Creating the database tables required
Supabase already provides a useful auth table set that’ll store information about our users, we’ll however need to create a few more tables for merchant, transaction and payment-related data.
For a start, the following database setup should do well for us:

Database Level Security
Supabase has a great feature called Row Level Security Policies that allows you to specify who has access to what resources in which tables. Consider it similar to Firebase Security Rules that work well with your Authentication layer to give you useful information and lets you decide the action the user can perform, ranging from Select, Create, Update, and Delete.
On our backend, i.e: Trusted environments, we’ll be utilizing the Supabase Service Role Key from our project to initialize our client, so we get access to the entire supabase ecosystem and bypass row-level security policies for resources to get everything done quickly.
Setting Up Supabase SDK Client
We’ll create a couple of clients for our Supabase app, one with regular privileges for our client-side, and one with full privileges to our backend resources, to be used only on the server-side for backend processing.
// api/supabase/index.js
import { createClient } from "@supabase/supabase-js";

let supabase;
const supabaseUrl = process.env.NEXT_PUBLIC_SUPABASE_URL;
const supabaseKey = process.env.NEXT_PUBLIC_SUPABASE_KEY;

if (!supabase || typeof window === "undefined")
	supabase = createClient(supabaseUrl, supabaseKey);

export default supabase;

// api/supabase/adminClient.js
import { createClient } from "@supabase/supabase-js";

let supabase;
const supabaseUrl = process.env.NEXT_PUBLIC_SUPABASE_URL;
const supabaseKey = process.env.SUPABASE_SERVICE_KEY;

if (!supabase || typeof window === "undefined")
	supabase = createClient(supabaseUrl, supabaseKey);

export default supabase;
Setting Up User Authentication With Google
To remove the entire hassle for our users to have to log in with email/password or phone numbers and worry about OTPs, we’ll just offload the authentication work to Google.
Supabase has a sufficiently good implementation of Google OAuth-based login for our users to use.
Supabase has a guide on setting up Google Auth for your project.
// api/auth.js
import supabase from "./supabase";

export const signInWithGoogle = () =>
	supabase.auth.signIn(
		{ provider: "google" },
		{ redirectTo: window.location.toString() }
	);

export const verifyAccessToken = (accessToken) =>
	supabase.auth.api.getUser(accessToken);
Scanning QR Codes on the Web
When you’re using a mobile app to make payments via UPI, the experience is seamless, you open your UPI App, scan the QR Code and proceed. We want to build something similar for the web, a way to scan QR Code interactively by just allowing the website permission to your camera for a specific amount of time, pointing your device at the QR Code and making the payment.
I was surprised to see there are already amazing libraries in JavaScript that will help us do the same, listing them below:
You can find a nice demo of the qr-scanner library here: https://nimiq.github.io/qr-scanner/demo/
I decided to use it because it is light and has the handling setup for a lot of things out of the box including Flashlights, Camera Lists and even turning camera usage off when you switch the tab to some other tab or become inactive.
Getting UPI ID From QR Code
QR Codes are nothing but pieces of text, most often links. The only thing we need to remember about UPI QR Codes is that they are links but start with the upi:// protocol as discussed before.
The UPI ID is stored in the pa parameter in the query parameters of the URL.
Getting the UPI ID is very simple:
const getUPIIdFromQRLink = (link) => {
	return new URLSearchParams(
		new URL(link.replace("upi://", "https://")).search
	).get("pa");
};
Setting Up Our Webhooks
As mentioned above in the flow diagrams, we would need a webhook from Razorpay to confirm that payment was received. With the information present in the notes field for the payment order created, we’ll link it to a specific transaction that the user tried to complete.
If you’re not aware of what webhooks are, you can read this post of mine.
Using Next.js’ api routes feature, we’ll create an API Endpoint that Razorpay can hit, with a payment.successful or payment.failed response.
export default async function (req, res) {
	const event = req.body.event;
	switch (event) {
		case "payment.successful":
			// Mark the payment as successful
			// Transfer the money to the merchant using Razorpay route
			break;
		case "payment.failed":
			// Mark the payment as failed
			break;
	}
	return res.status(200);
}
Razorpay Route APIs will help us transfer money from the received payment to the merchant’s account.
Outcome
You can see the outcome at Alt’s website. It’s a work in progress, I’ll keep adding more information and flows to it as time passes.
Taking a product like this live requires operational overheads like making merchants aware of the product, getting them to start using it and of course, gathering customers to use the system.
On top of that, there are regulatory concerns about taking a product like this to market.